Some of you may be wondering what has been going on with the new acquisitions. Well, so far I have done many of the case repairs on the bulk of them, but none are completed yet. Here's a quick summary of what's done and not done on the clocks I've started to restore.
8 Day Sperry Ogee:
- Veneer repairs done
- Case corners reglued
- Dust covers stained and ready to use
- Loose label fragments reglued
- Gong screws antiqued and reinstalled
- Piece of brown paper tape on backboard darkened to match (I didn't want to remove it but I wanted to hide it)
- Additional dial holes and movement mounting block holes patched
Still to do:
- Shellac touch-ups/wax polish
- Find and fit a wood dial (or make and paint one)
- Clean and repair the movement
- Make a minute hand to match the hour hand
- Fit missing parts (weight lines, hooks, weights, bob, etc)
- Painted stenciled glass
8 Day New Haven 2 Door Ogee:
- Veneer repairs to case
- Centre bar rebuilt, veneered, and installed
- Case corners reglued/repaired
- Bottom of case flattened and stained
- Extra dial holes filled
- Pulley repair
Still to do:
- Repair the doors (reglue, square-up, veneer patches, reinstall hinges properly, etc)
- Fit dust covers
- Shellac touch-ups/wax polish
- Find/fit a correct movement, dial, weights, hands, etc
- Painted tablet
Sperry & Shaw 8 Day Column Clock:
- Case repairs
- Veneer repairs
Still to do:
- Shellac touch-ups/wax polish
- Clean and repair movement
- Fit dust covers
E. W. Adams Wooden Works:
- Case repairs (reglue/clamp several pieces)
- Veneer repairs
Still to do:
- Shellac touch-ups/wax polish
- Fit dust covers
- Find/install movement, dial, and parts (this is still largely an empty case)
Jerome & Co. Column & Cornice Clock:
- Veneer repairs
Still to do:
- Shellac finish entire case/wax polish
- Clean and repair movement
- Fit dust covers
- Painted glasses
- Fit hands
C. & L. C. Ives Triple Decker:
- Veneer repairs & case touch-ups
- Cut and fit ivory escutcheon to lower door
- Tint lower door darker
- Cut, veneer, and fit top returns and glue blocks
- Chipped column repair
- Fit hands
Still to do:
- Fit mirror or tablet in centre
- Fit dust covers
- Shellac touch-ups/wax polish
- Clean and repair movement
- Cut, fit, and install rear crest stiffener strips
- Cut and install new (old) dial glass
Wadsworth Pillar & Scroll:
- Patterns cut and prepared (top scroll, base, side returns, etc scaled on the PC from an original)
- Front damaged veneer band pieces removed (wire nails removed) and reglued
Still to do:
A lot. I only just started this one.

Showing posts with label Hide Glue. Show all posts
Showing posts with label Hide Glue. Show all posts
Tuesday, September 5, 2017

Sunday, May 28, 2017
Antique Hopf (Repro) Violin Restoration
I recently finished the restoration of my Hopf violin. I just have to get it set up and strung. I thought I would share the before and after photos. This is not clock related, but many of the techniques and materials are the same as those that I use in clock repair: hide glue, shellac, veneer tools such as small saws, small clamps, sand papers, etc.
This is an antique violin marked "HOPF" on the back, but it's generally referred to as a fake Hopf violin (in the same way that you can buy a Stradivarius copy today). The real ones made by this 17th century family are marked only on the interior, and they are far more valuable. This one is somewhat poorly built (with no interior corner blocks), and there are several other small issues with it, such as a curve to the neck, and very poorly (crookedly) drilled peg holes. Another dead giveaway that this was originally a cheap German made violin is the fact that the fittings on it were made from cheap woods. I'll repeat this with the accompanying photos below, but the fingerboard was PINE (which is absolute garbage because it needs to be a hardwood at the bare minimum - ebony being the preferred choice), and the pegs (the one original one that was left) and the tailpiece were maple stained/painted black.
All that being said, it's still an OLD violin, probably from around 1900. This is the kind of violin you are likely to come across if your uncle/father/grandmother etc. happens to have an old violin lying around somewhere. Some are better than others, but generally all old violins will have a decent sound because the wood has aged, they've gathered patina, they were played frequently, and most of all: they were hand made. The variations in thickness, as well as the hand varnishing both add significantly to the quality/desirability/sound of a violin. Modern mass produced violins are cut by CNC and because they are too perfect/precise, they tend to have a certain generic sound to them that violin experts can pick up immediately. My ears aren't that well trained. Once this one is playable, it should have a fairly mellow sound.
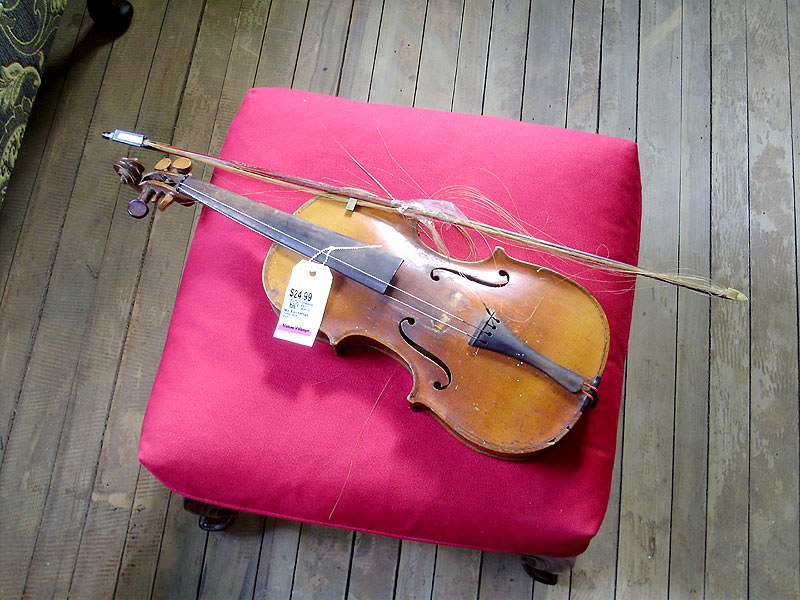
Anyhow, I picked up this poor little thing all battered and abused from a local thrift shop for 25$ CAD + taxes. I'd say that's a pretty darn good price. It came with a pretty beat-up/ruined bow, which I might also try to repair.
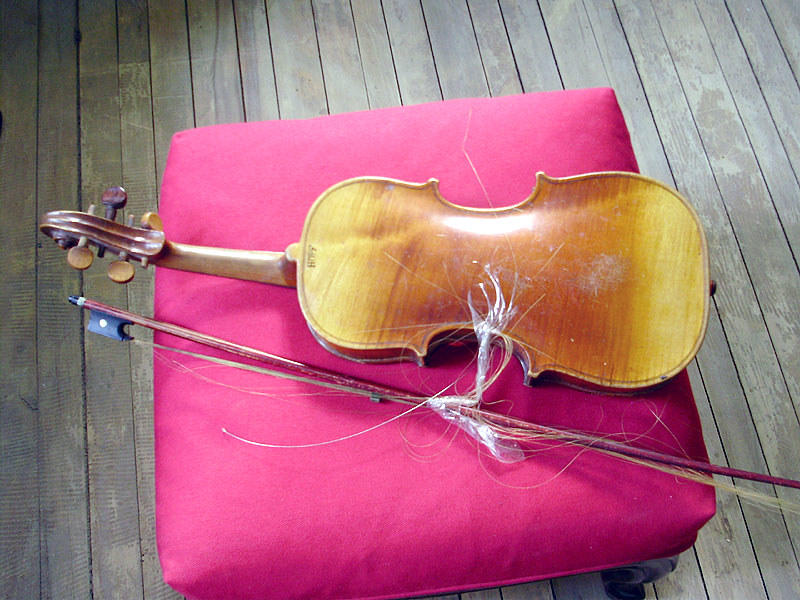
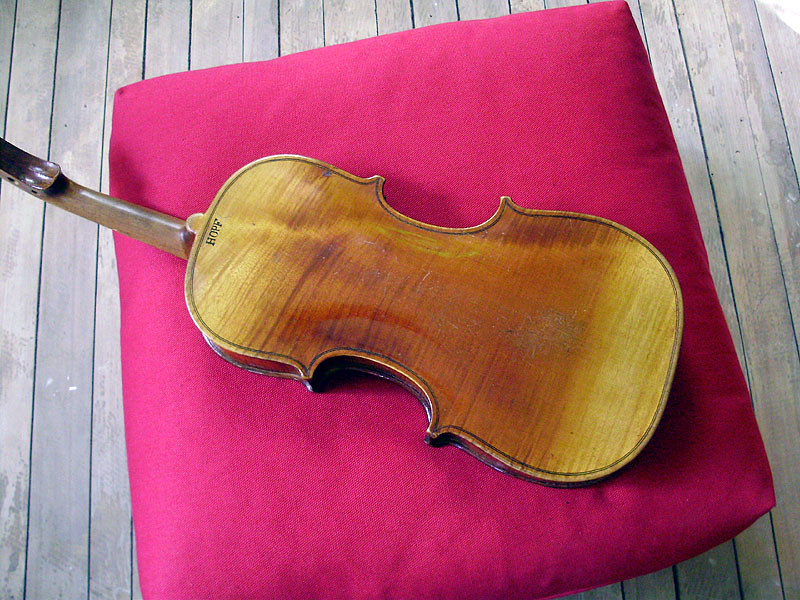
One-piece flame maple back with a two-tone colour.
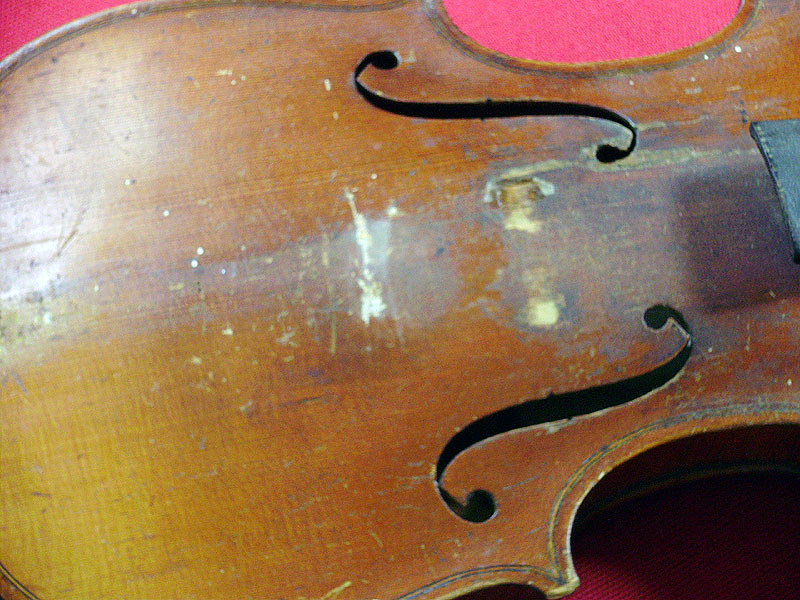
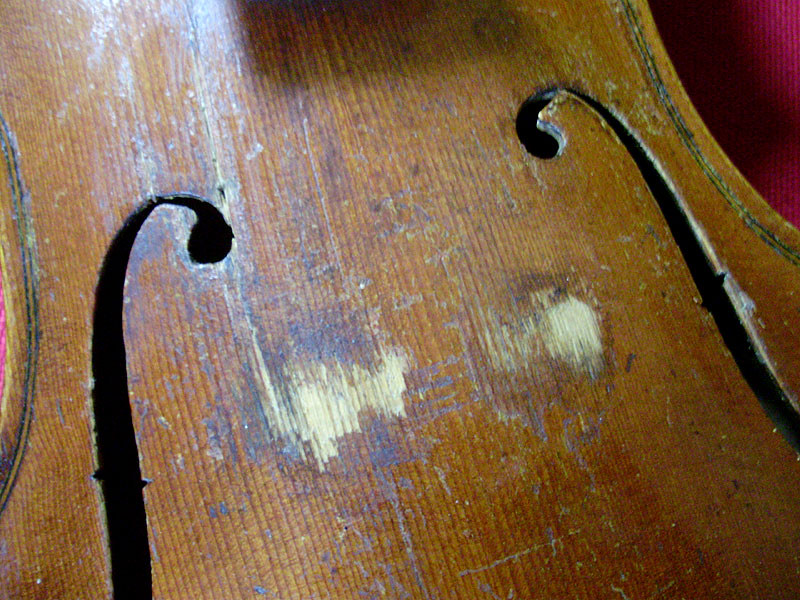
The top was badly gummed-up and dirty. The area where the bridge sat was also very badly scratched down to bare wood.
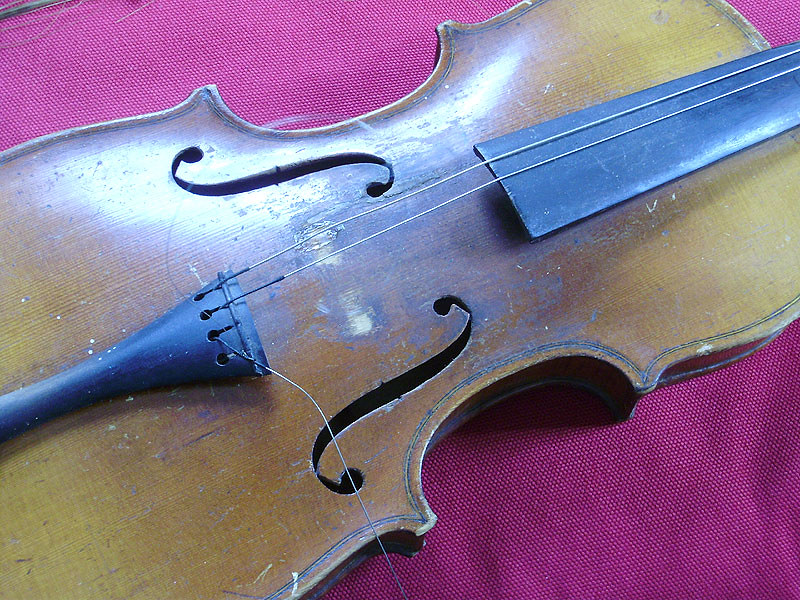
The tailpiece had also scratched up the top.
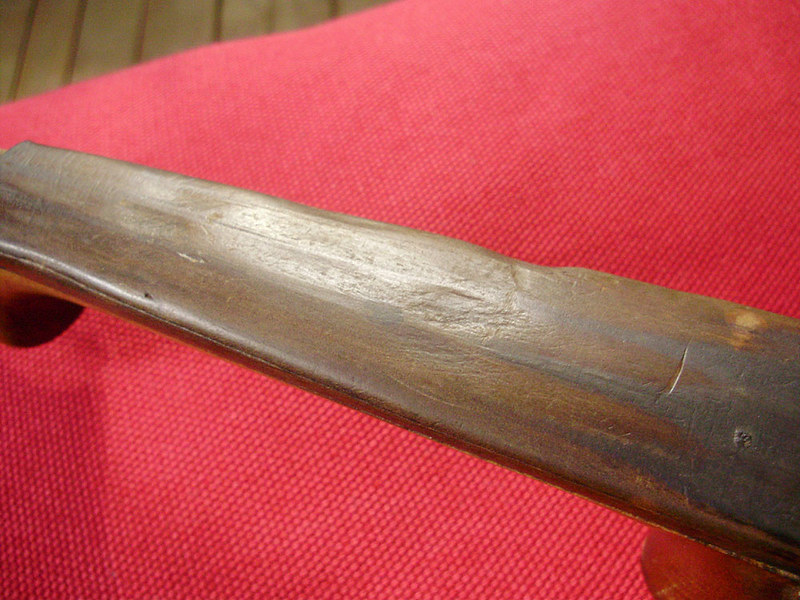
The SEVERELY worn down pine fingerboard. Obviously this instrument was played a LOT.
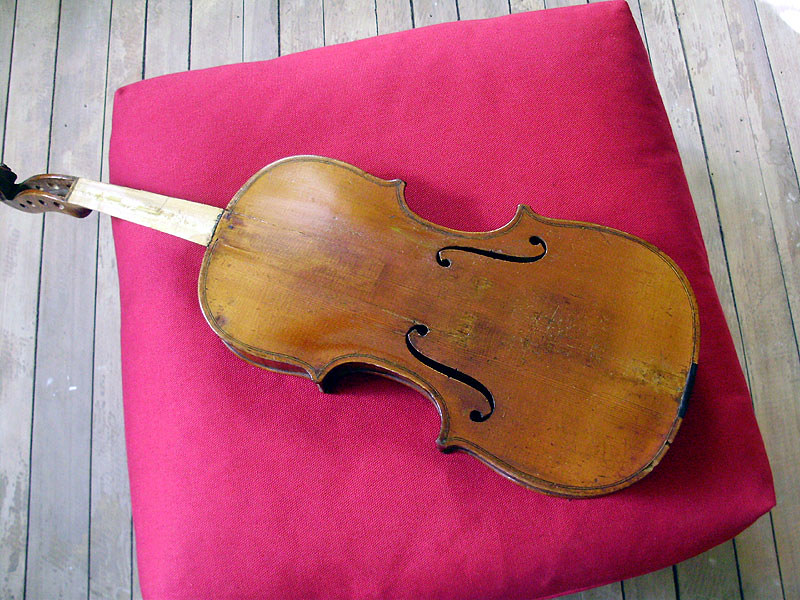
This was after I repaired/blended and touched-up the top. There were also wear marks along the edges of the top. It's not perfect, and there are a few blotchy areas, but I wanted to preserve as much of the character/patina as possible.
I did not do very much with the back. Mostly just a cleaning and wax polish.
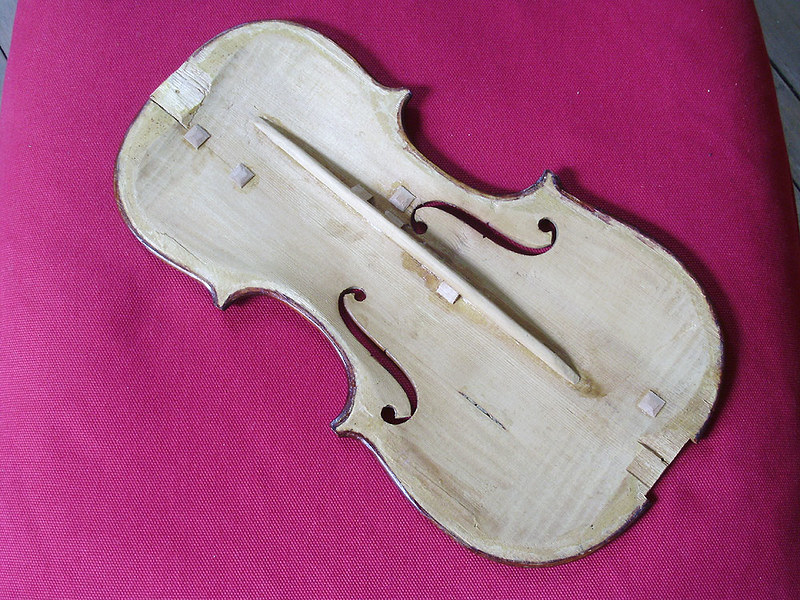
The top had at least two very bad cracks in it (which eventually ended up being 4 cracks), so I had to separate it to repair it. You can see how there are no corner blocks in the pointed corners.
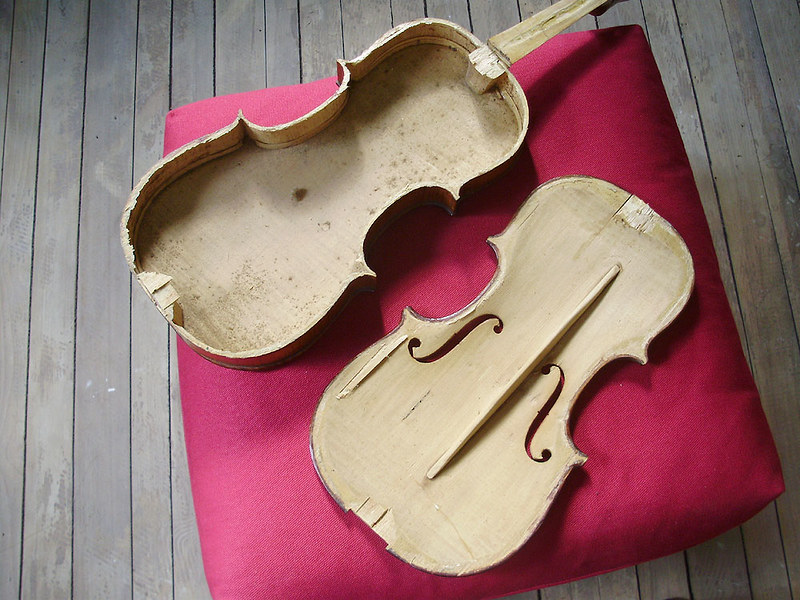
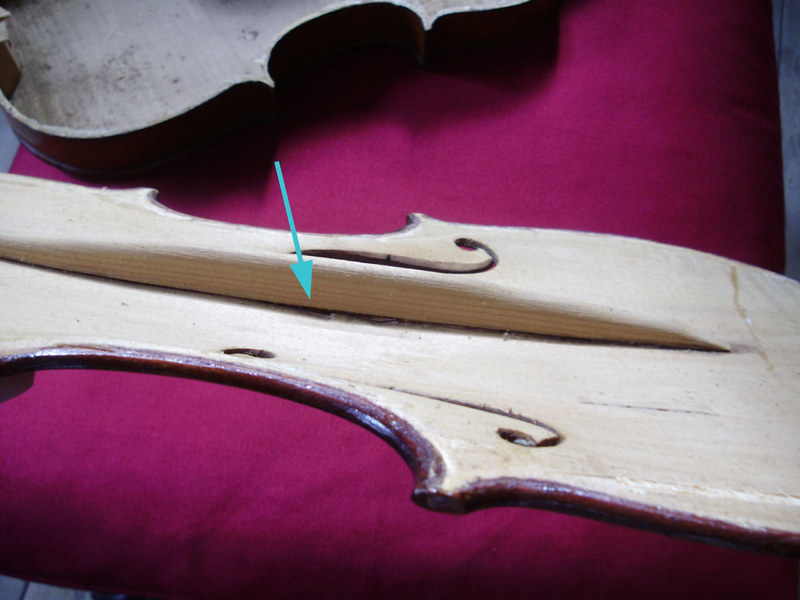
I discovered a very alarming problem with the violin's top, and I was very glad that I decided to remove the top. The entire bass bar was split and coming loose from the top. There was also a crack along the edge (where the bridge sits).
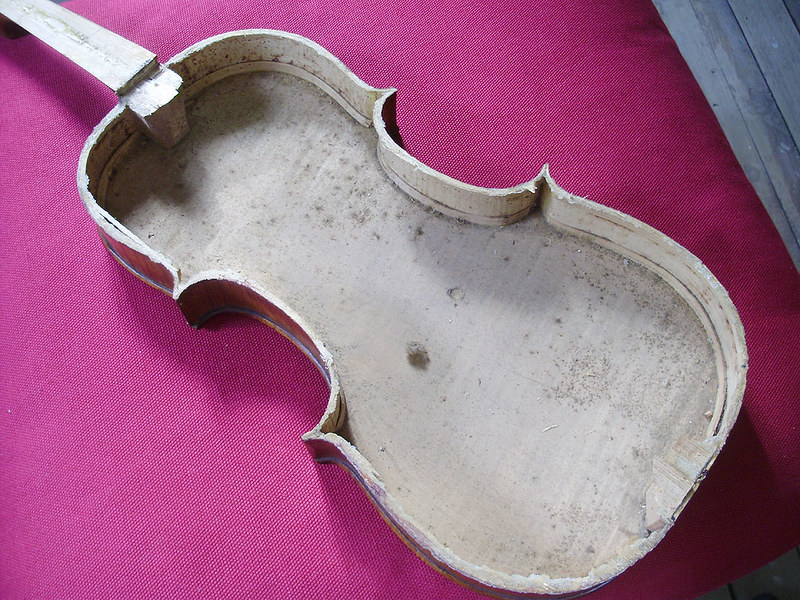
Interior view. No names, inscriptions, or repair dates. Just dust.
Some of the top repairs were easier to glue than others.
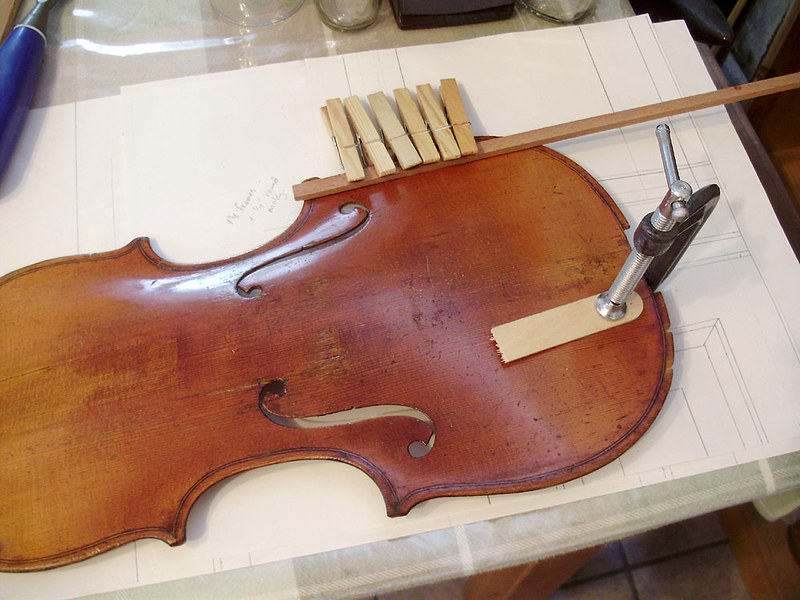
I did look at several violin repair tutorials and fixed it in the normal acceptable current method, which is to install small patch blocks (cross grain glued) made from cedar, and then pared down thin. I also had to slightly sand and re-shape the glue-side of the bass bar for a tighter fit.
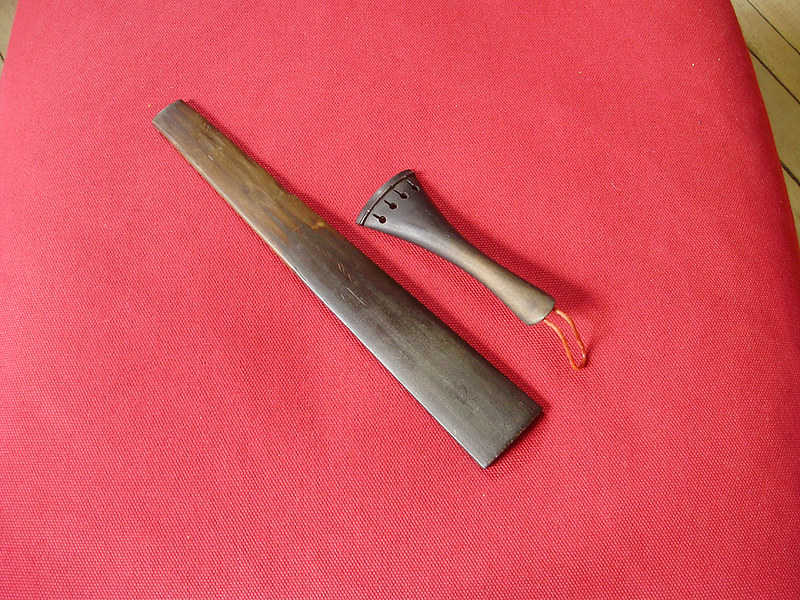
Here were the cheap fittings. Painted pine fingerboard, and maple tailpiece stained to look like ebony.
A quick note: when it comes to violins, there doesn't seem to be any real impact what fittings you put on it. Generally it needs an ebony fingerboard, nut, and saddle, but the other fittings are to your choice. The pegs, tailpiece, and chin rest can be any wood you like (Rosewood, Boxwood, and other exotic woods are popular). Some can be carved, or have fancy inlays of shells, ivory or metals. Changing the fittings doesn't seem to affect the value of a violin. For this one, I went through a lot of trouble to track down plain ebony fittings (no inlay or anything, just very plain black ebony).
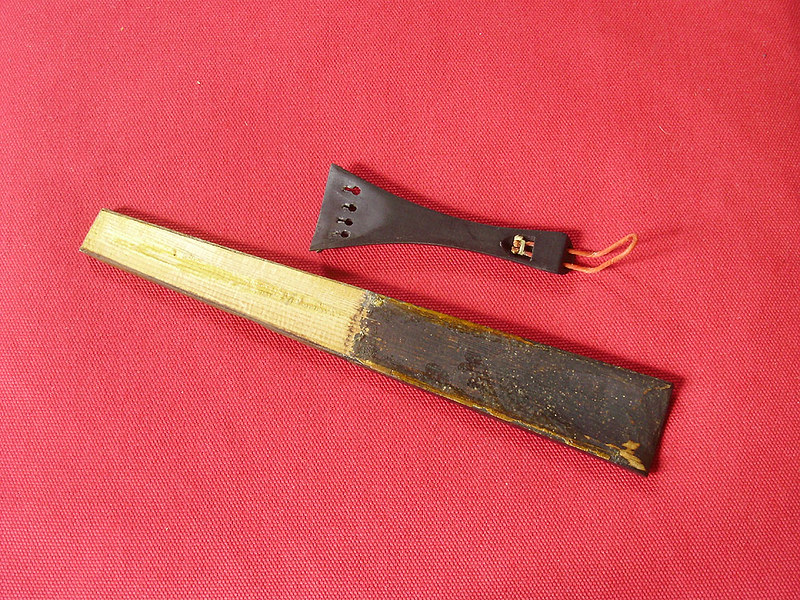
Before and after:
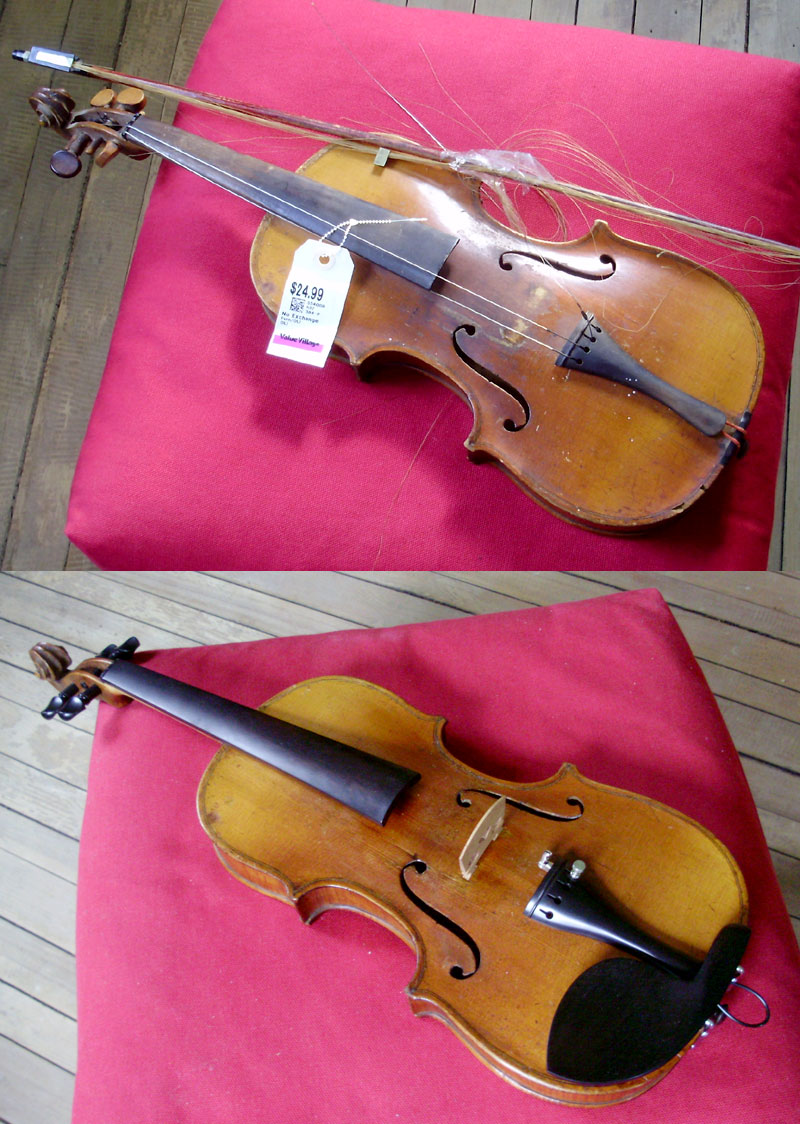
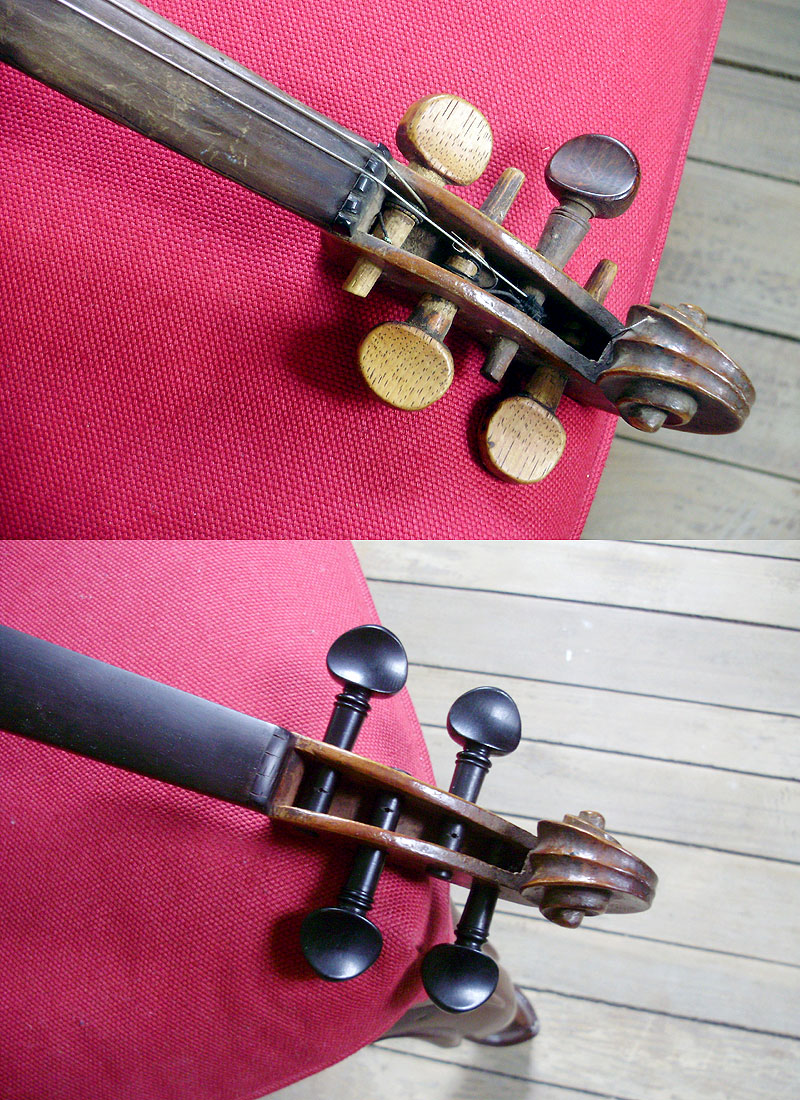
The old pegs were a complete mess. Someone had hand carved some very crude oak pegs for this and they did not work or look good. When I fit the new pegs, I had to enlarge the worn out holes slightly, so I tried to straighten the pegs as much as possible. Most are good, but the bottom one is still quite crooked. Also note the nut (before and after). Yikes!
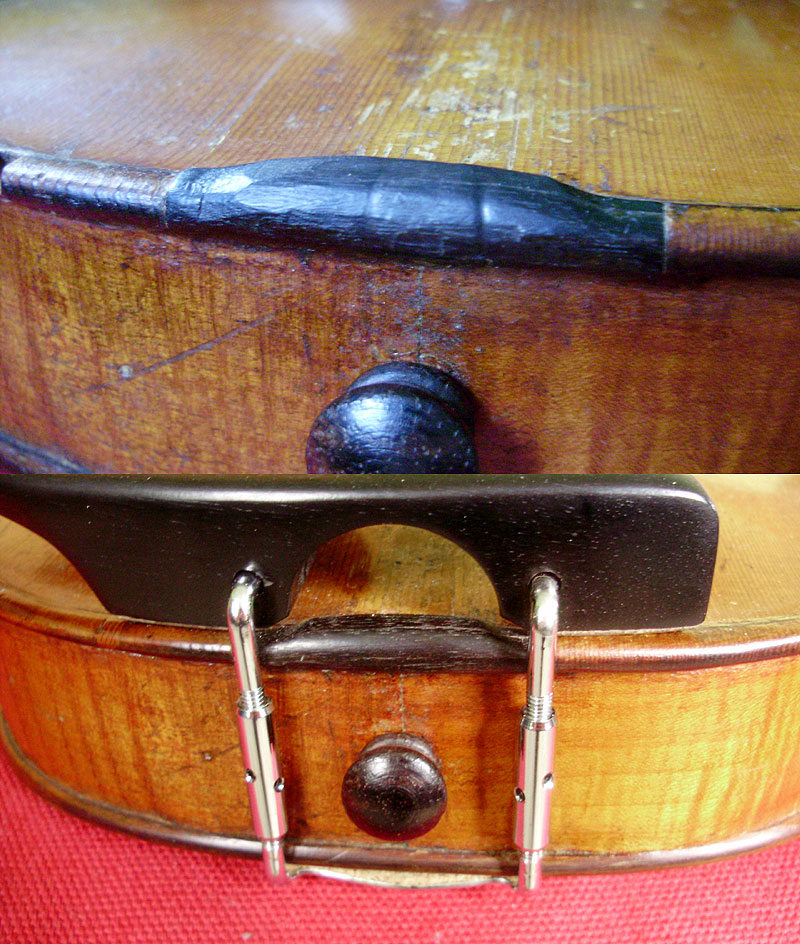
The saddle that was there was probably a replacement, but it was very badly carved. It didn't need to be replaced, but I did clean it up and sand it significantly. I had a new end button in my new parts, but I chose to keep the old one (this is the only part of the old fittings I kept because it was actually ebony).
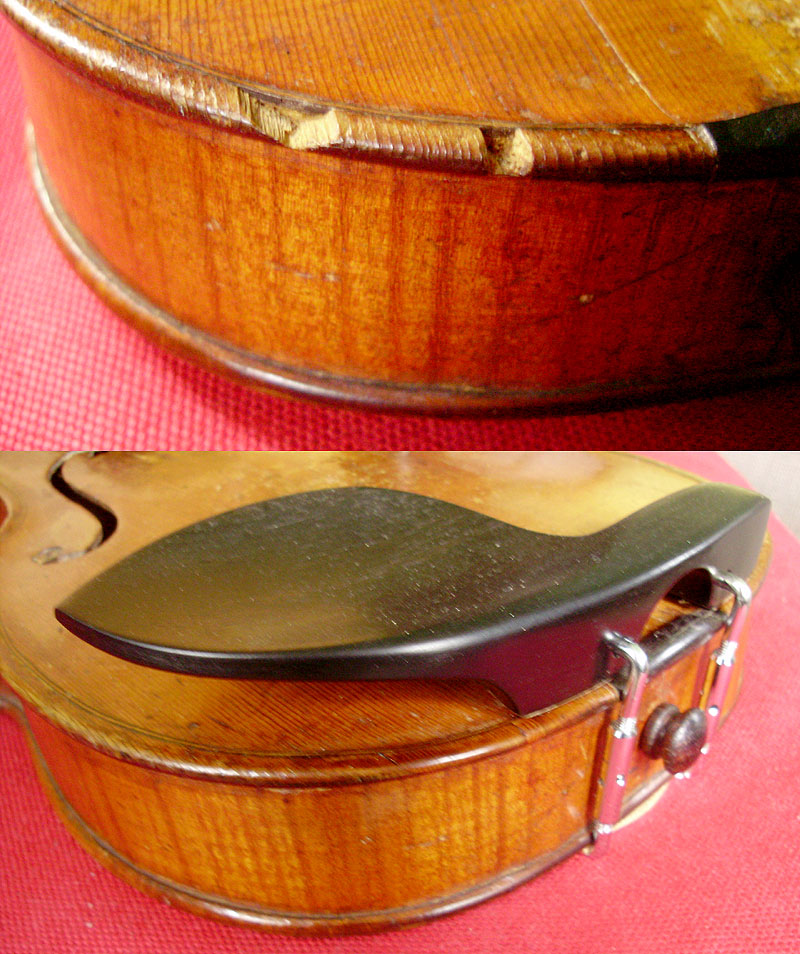
The top had two small chunks broken from the edge that I was able to patch. One is nearly invisible, but the other one shows a little bit.
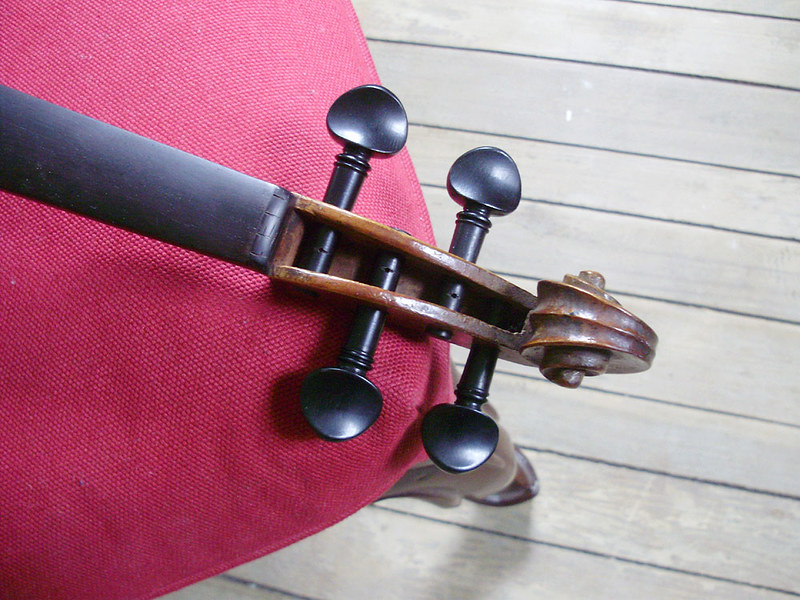
A close up of just the pegbox:
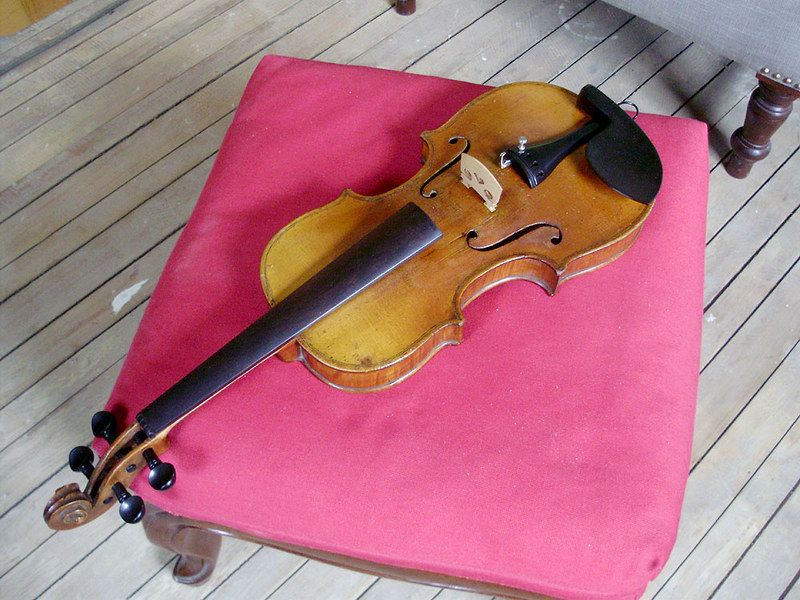
Hand carved and antiqued bridge
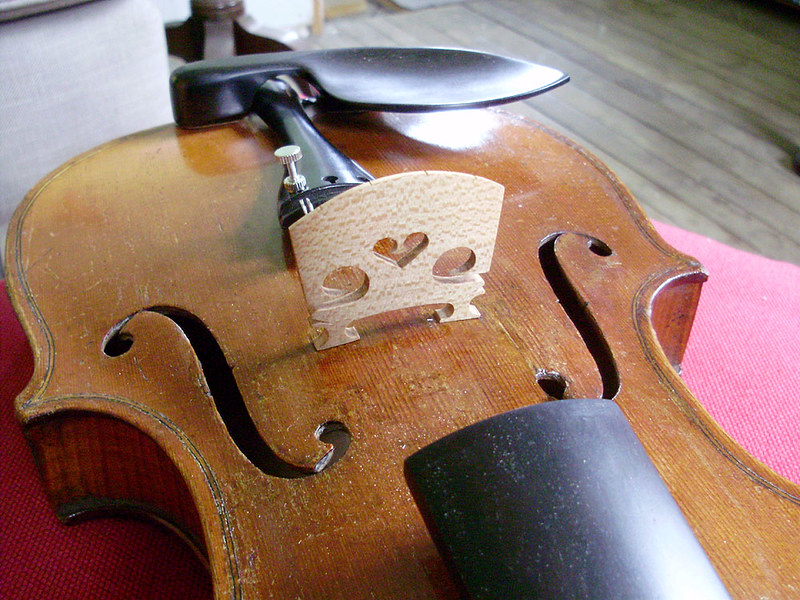
That's it. I may post a photo of it again once it's strung.
This is an antique violin marked "HOPF" on the back, but it's generally referred to as a fake Hopf violin (in the same way that you can buy a Stradivarius copy today). The real ones made by this 17th century family are marked only on the interior, and they are far more valuable. This one is somewhat poorly built (with no interior corner blocks), and there are several other small issues with it, such as a curve to the neck, and very poorly (crookedly) drilled peg holes. Another dead giveaway that this was originally a cheap German made violin is the fact that the fittings on it were made from cheap woods. I'll repeat this with the accompanying photos below, but the fingerboard was PINE (which is absolute garbage because it needs to be a hardwood at the bare minimum - ebony being the preferred choice), and the pegs (the one original one that was left) and the tailpiece were maple stained/painted black.
All that being said, it's still an OLD violin, probably from around 1900. This is the kind of violin you are likely to come across if your uncle/father/grandmother etc. happens to have an old violin lying around somewhere. Some are better than others, but generally all old violins will have a decent sound because the wood has aged, they've gathered patina, they were played frequently, and most of all: they were hand made. The variations in thickness, as well as the hand varnishing both add significantly to the quality/desirability/sound of a violin. Modern mass produced violins are cut by CNC and because they are too perfect/precise, they tend to have a certain generic sound to them that violin experts can pick up immediately. My ears aren't that well trained. Once this one is playable, it should have a fairly mellow sound.
Anyhow, I picked up this poor little thing all battered and abused from a local thrift shop for 25$ CAD + taxes. I'd say that's a pretty darn good price. It came with a pretty beat-up/ruined bow, which I might also try to repair.
One-piece flame maple back with a two-tone colour.
The top was badly gummed-up and dirty. The area where the bridge sat was also very badly scratched down to bare wood.
The tailpiece had also scratched up the top.
The SEVERELY worn down pine fingerboard. Obviously this instrument was played a LOT.
This was after I repaired/blended and touched-up the top. There were also wear marks along the edges of the top. It's not perfect, and there are a few blotchy areas, but I wanted to preserve as much of the character/patina as possible.
I did not do very much with the back. Mostly just a cleaning and wax polish.
The top had at least two very bad cracks in it (which eventually ended up being 4 cracks), so I had to separate it to repair it. You can see how there are no corner blocks in the pointed corners.
I discovered a very alarming problem with the violin's top, and I was very glad that I decided to remove the top. The entire bass bar was split and coming loose from the top. There was also a crack along the edge (where the bridge sits).
Interior view. No names, inscriptions, or repair dates. Just dust.
Some of the top repairs were easier to glue than others.
I did look at several violin repair tutorials and fixed it in the normal acceptable current method, which is to install small patch blocks (cross grain glued) made from cedar, and then pared down thin. I also had to slightly sand and re-shape the glue-side of the bass bar for a tighter fit.
Here were the cheap fittings. Painted pine fingerboard, and maple tailpiece stained to look like ebony.
A quick note: when it comes to violins, there doesn't seem to be any real impact what fittings you put on it. Generally it needs an ebony fingerboard, nut, and saddle, but the other fittings are to your choice. The pegs, tailpiece, and chin rest can be any wood you like (Rosewood, Boxwood, and other exotic woods are popular). Some can be carved, or have fancy inlays of shells, ivory or metals. Changing the fittings doesn't seem to affect the value of a violin. For this one, I went through a lot of trouble to track down plain ebony fittings (no inlay or anything, just very plain black ebony).
Before and after:
The old pegs were a complete mess. Someone had hand carved some very crude oak pegs for this and they did not work or look good. When I fit the new pegs, I had to enlarge the worn out holes slightly, so I tried to straighten the pegs as much as possible. Most are good, but the bottom one is still quite crooked. Also note the nut (before and after). Yikes!
The saddle that was there was probably a replacement, but it was very badly carved. It didn't need to be replaced, but I did clean it up and sand it significantly. I had a new end button in my new parts, but I chose to keep the old one (this is the only part of the old fittings I kept because it was actually ebony).
The top had two small chunks broken from the edge that I was able to patch. One is nearly invisible, but the other one shows a little bit.
A close up of just the pegbox:
Hand carved and antiqued bridge
That's it. I may post a photo of it again once it's strung.
Monday, June 6, 2016
John Birge & Co. 1848 Column & Cornice Clock - Case Restoration
These column clocks are always a lot of work to restore. What might initially look like an easy job with just a few veneer repairs and touch-ups usually ends up turning into a complete disassembly job with infinitely more work involved. I mention this mostly as a warning to those who may be asked to undertake one of these restorations for potential clients, or for beginners. None of the techniques involved are particularly difficult, but a lot of care goes into wood and veneer selection, colour matching, and finishing. All of the repairs are done in a sensitive manner in keeping with the traditional methods and materials used. Hide glue is used on all veneer repairs, and I will only rarely use PVA (white or yellow carpenter's glue) on areas that need a solid and permanent repair between NEW (fresh wood) joints. Any surfaces that have traces of old glue must again be glued with hide glue.
Because the columns on my clock were very crooked (and broken at the tops) as well as the fact that 2 main components had large cracks through them (the right side and the base), the decision to completely knock the case apart was made early on.
This restoration started in late summer 2014 and was only completed yesterday when I finished working on the crown and attached it to the case. I was not working on the clock continually, but I was to reinforce the fact that this was a 2 year project. Despite all the work, however, I find that these are some of the most rewarding restorations to work on. These cases are exceptionally beautiful, and one can't help but admire all the work and skill that went into making them.
See "before" photos here: http://jcclocks.blogspot.ca/2016/01/john-birge-co-1848-column-cornice-clock.html
Main Case Work:
Case knocked apart:


This chip was not very visible in the "before" photos, but it was simple to repair.


Something that is quite odd is that the shadow and glue line where the columns were attached seem to show a decent amount of age. The crooked columns had been that was for quite a while, though I'm confident that they would never have left the factory that way.

A lot of the new and old glue (from previous repairs) had to be painstakingly removed from case components.


For several months working on this on and off, this is generally what the work area would look like. Piles of veneer, case pieces, tape, pencils, saws, and chisels everywhere. Note: 3 different clock cases were being worked on, as well as a mahogany veneered box, and 2 violins, which are visible in several other photos.

This shows the chip above being patched (temporarily taped in place), as well as the base for a Seth Thomas wooden works (one of the sides is visible just above it).

I'm holding the John Birge top (above) as well as the top of the Seth Thomas wooden works (below).

These were the remains of the veneer chips from one side of the John Birge base. They were not worth saving with the clock, but the veneer was kept for other small repairs.

It's always useful to have a wide variety of veneer on hand. These are packets of matching crotch mahogany veneer that were purchased in bulk very inexpensively on eBay. I have a lot of pieces to choose from, which is very helpful when patching figured mahogany veneers.

The top of the case had an odd break in it which was caused by a flaw in the board. The break had also shrunk slightly and curved under the driving weight. It was lined-up and glued as close as possible to the original alignment.


The most important part in this particular case, is that the outside edge lines up evenly.

Partially repaired top (right), partially repaired Seth Thomas top (centre) and the base of the John Birge showing a large diagonal crack that will need to be fixed (left).

More bits and pieces. This shows the door of the "mystery" wooden works clock, which I was also working on.

Here you can see the break to the base. This is what caused some of the veneer to break off on the side as well as on the front of the base. The arrow shows a broken and worn back corner, which was later patched with wood.


Veneer breaks on both doors.

One loose corner joint, and another chipped corner.

This was after gluing the crack in the base.

More veneer scraps and chunks of solid wood for repairs. A tiny instrument maker's saw is always good to have for veneer work. I also use those two tiny wooden squares fairly often.

Repairing the crack on the right side.

Gluing thick wood veneers on both ends of the base.

Starting to re-assemble the case.


These next photos show how the broken corners of the column capitals were repaired. The breaks were cut into clean shapes with flat surfaces. New pieces of mahogany were cut and fitted, then glued in place.


Since the wood is oriented in a way that makes it very fragile, the bulk was trimmed slowly and carefully with a small saw, and the rest was very carefully cut with sharp chisels. Once the shape was correct, the profiles were sanded smooth.

Stain.

Additional shading, toner, and shellac:

Gluing and nailing the columns in place. Square nails were used.

Interior views. Note that the vertical strip (stop moulding) for the lower door, is new. It was glued in place and antiqued to match.

Also note the two badly damaged/worn corners were repaired.

These are mostly included to show the case construction. I had to make sure that the vertical strips were installed correctly for the door to clear properly. Even the tiniest difference in the spacing will mess this up, so make sure to temporarily install the door when gluing and nailing these vertical members (before columns are attached).


If any of the label needs repairs, do this before reattaching the back.
Bits & Pieces:
I was able to purchase a set of correct "Spade and Pointer" hands for the clock, however, the minute hand had about 1/4" clipped off, which I repaired later. You will also note that I was able to remove that large black stain between the 9 and 10. I believe I used paint thinner to remove it, but I'm not 100% sure.

New hooks were prepared (and antiqued) for the clock. Gun Blue was used for this.
Before:

After:

The Crown:
The crown gets its own separate section because about half the case restoration work was on this one item. This particular crown was in worse shape than most, because it had some previous (poor) repairs. Some of these repairs included sanding down the top edges of the crown making them uneven and unsightly. Because of this, new long thin wedges had to be glued in place, and then blended in. The left side of the crown was also a later replacement without any mahogany veneer on it. The shape wasn't perfect, but it was very close.
To be able to glue veneer to this, it would need to have all the finish and stain sanded off.


New crotch mahogany veneer (oriented in the "short grain" direction) was prepared, boiled in water to soften it, then clamped in place to pre-shape it.

After drying, it was then glued to the base wood with hide glue. While the glue dried (slowly), a few small cracks formed in the veneer, but nothing too serious. Another thing to note: these John Birge clocks have the thin top strips of veneer along the crown in the "long" direction, while later Birge clocks have the veneer in the "short" direction. Match what's on your case, as this can make a big difference.


This detail photo shows some of the botch repair by a previous restorer, where the glue lines in the crown didn't add up, so the crown was sanded down crooked. Since the veneer here was also chipped, I replaced the entire section.

Some of the wood was removed to fit a new patch.

The same was done on the opposite side, but the veneer on this one was good, so I carefully cut around it.


These are all the chunks and wedges ready to glue in place.

The crown was re-assembled using a paper template guide, as well as "spring clamps" made from old upholstery springs.


After staining and finishing the re-veneered section, it continued to develop cracks, and it was NOT looking good at all.


I decided to remove all the veneer and start over. The moulding was sanded to bare wood again, and this time I used contact cement instead of hide glue. I didn't want to use contact cement, but I knew it would work, and the base is not original, so I didn't feel too bad about it. I will have to practice veneering with hide glue for future projects.
The newly repaired and finished section of crown was then glued to the rest of the assembly.


New glue blocks were made and installed to replace the missing ones on the left side.

These two are original.

A new mounting hole was drilled (carefully - to line up with the old existing hole). A spade bit was used for this, as well as a 3/16" bit to open-up the centre.

Here's the re-veneered section.

Detail of some of the patches.


After all those repairs, the crown was then glued, screwed, and clamped to the case.

The last part was to blend and antique the finish on the top to hide all the repairs. I was pretty happy with the results.

Because the columns on my clock were very crooked (and broken at the tops) as well as the fact that 2 main components had large cracks through them (the right side and the base), the decision to completely knock the case apart was made early on.
This restoration started in late summer 2014 and was only completed yesterday when I finished working on the crown and attached it to the case. I was not working on the clock continually, but I was to reinforce the fact that this was a 2 year project. Despite all the work, however, I find that these are some of the most rewarding restorations to work on. These cases are exceptionally beautiful, and one can't help but admire all the work and skill that went into making them.
See "before" photos here: http://jcclocks.blogspot.ca/2016/01/john-birge-co-1848-column-cornice-clock.html
Main Case Work:
Case knocked apart:
This chip was not very visible in the "before" photos, but it was simple to repair.
Something that is quite odd is that the shadow and glue line where the columns were attached seem to show a decent amount of age. The crooked columns had been that was for quite a while, though I'm confident that they would never have left the factory that way.
A lot of the new and old glue (from previous repairs) had to be painstakingly removed from case components.
For several months working on this on and off, this is generally what the work area would look like. Piles of veneer, case pieces, tape, pencils, saws, and chisels everywhere. Note: 3 different clock cases were being worked on, as well as a mahogany veneered box, and 2 violins, which are visible in several other photos.
This shows the chip above being patched (temporarily taped in place), as well as the base for a Seth Thomas wooden works (one of the sides is visible just above it).
I'm holding the John Birge top (above) as well as the top of the Seth Thomas wooden works (below).
These were the remains of the veneer chips from one side of the John Birge base. They were not worth saving with the clock, but the veneer was kept for other small repairs.
It's always useful to have a wide variety of veneer on hand. These are packets of matching crotch mahogany veneer that were purchased in bulk very inexpensively on eBay. I have a lot of pieces to choose from, which is very helpful when patching figured mahogany veneers.
The top of the case had an odd break in it which was caused by a flaw in the board. The break had also shrunk slightly and curved under the driving weight. It was lined-up and glued as close as possible to the original alignment.
The most important part in this particular case, is that the outside edge lines up evenly.
Partially repaired top (right), partially repaired Seth Thomas top (centre) and the base of the John Birge showing a large diagonal crack that will need to be fixed (left).
More bits and pieces. This shows the door of the "mystery" wooden works clock, which I was also working on.
Here you can see the break to the base. This is what caused some of the veneer to break off on the side as well as on the front of the base. The arrow shows a broken and worn back corner, which was later patched with wood.
Veneer breaks on both doors.
One loose corner joint, and another chipped corner.
This was after gluing the crack in the base.
More veneer scraps and chunks of solid wood for repairs. A tiny instrument maker's saw is always good to have for veneer work. I also use those two tiny wooden squares fairly often.
Repairing the crack on the right side.
Gluing thick wood veneers on both ends of the base.
Starting to re-assemble the case.
These next photos show how the broken corners of the column capitals were repaired. The breaks were cut into clean shapes with flat surfaces. New pieces of mahogany were cut and fitted, then glued in place.
Since the wood is oriented in a way that makes it very fragile, the bulk was trimmed slowly and carefully with a small saw, and the rest was very carefully cut with sharp chisels. Once the shape was correct, the profiles were sanded smooth.
Stain.
Additional shading, toner, and shellac:
Gluing and nailing the columns in place. Square nails were used.
Interior views. Note that the vertical strip (stop moulding) for the lower door, is new. It was glued in place and antiqued to match.
Also note the two badly damaged/worn corners were repaired.
These are mostly included to show the case construction. I had to make sure that the vertical strips were installed correctly for the door to clear properly. Even the tiniest difference in the spacing will mess this up, so make sure to temporarily install the door when gluing and nailing these vertical members (before columns are attached).
If any of the label needs repairs, do this before reattaching the back.
Bits & Pieces:
I was able to purchase a set of correct "Spade and Pointer" hands for the clock, however, the minute hand had about 1/4" clipped off, which I repaired later. You will also note that I was able to remove that large black stain between the 9 and 10. I believe I used paint thinner to remove it, but I'm not 100% sure.
New hooks were prepared (and antiqued) for the clock. Gun Blue was used for this.
Before:
After:
The Crown:
The crown gets its own separate section because about half the case restoration work was on this one item. This particular crown was in worse shape than most, because it had some previous (poor) repairs. Some of these repairs included sanding down the top edges of the crown making them uneven and unsightly. Because of this, new long thin wedges had to be glued in place, and then blended in. The left side of the crown was also a later replacement without any mahogany veneer on it. The shape wasn't perfect, but it was very close.
To be able to glue veneer to this, it would need to have all the finish and stain sanded off.
New crotch mahogany veneer (oriented in the "short grain" direction) was prepared, boiled in water to soften it, then clamped in place to pre-shape it.
After drying, it was then glued to the base wood with hide glue. While the glue dried (slowly), a few small cracks formed in the veneer, but nothing too serious. Another thing to note: these John Birge clocks have the thin top strips of veneer along the crown in the "long" direction, while later Birge clocks have the veneer in the "short" direction. Match what's on your case, as this can make a big difference.
This detail photo shows some of the botch repair by a previous restorer, where the glue lines in the crown didn't add up, so the crown was sanded down crooked. Since the veneer here was also chipped, I replaced the entire section.
Some of the wood was removed to fit a new patch.
The same was done on the opposite side, but the veneer on this one was good, so I carefully cut around it.
These are all the chunks and wedges ready to glue in place.
The crown was re-assembled using a paper template guide, as well as "spring clamps" made from old upholstery springs.
After staining and finishing the re-veneered section, it continued to develop cracks, and it was NOT looking good at all.
I decided to remove all the veneer and start over. The moulding was sanded to bare wood again, and this time I used contact cement instead of hide glue. I didn't want to use contact cement, but I knew it would work, and the base is not original, so I didn't feel too bad about it. I will have to practice veneering with hide glue for future projects.
The newly repaired and finished section of crown was then glued to the rest of the assembly.
New glue blocks were made and installed to replace the missing ones on the left side.
These two are original.
A new mounting hole was drilled (carefully - to line up with the old existing hole). A spade bit was used for this, as well as a 3/16" bit to open-up the centre.
Here's the re-veneered section.
Detail of some of the patches.
After all those repairs, the crown was then glued, screwed, and clamped to the case.
The last part was to blend and antique the finish on the top to hide all the repairs. I was pretty happy with the results.
Subscribe to:
Posts (Atom)