Here is the short video of the mirror clock that I shot today.

Showing posts with label Mirrors. Show all posts
Showing posts with label Mirrors. Show all posts
Saturday, July 11, 2015

Friday, July 10, 2015
Mirror Clock Project Part 9 - The Finished Clock
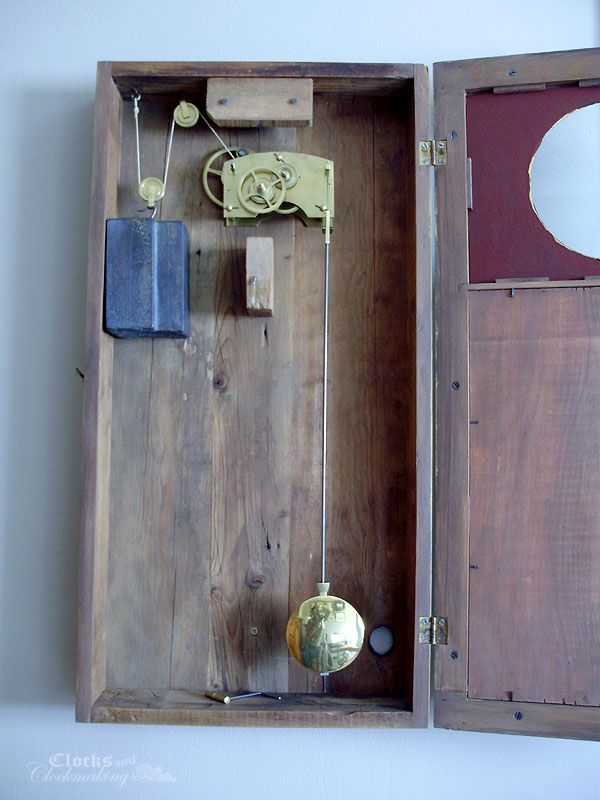
With the antique mirror finally installed, and all the final touch ups completed, the clock is now fixed to the wall properly (no more wooden block hanging on the wall), and it's ready to be used and enjoyed. A lot of work went into this reproduction, and I had a lot of fun working on it. It came out beautifully, and pretty soon I'll be working on another clock to house my custom made Lenderman movement.
I plan to make a short video of the mirror clock soon, and I will post it here once it's ready.



I plan to make a short video of the mirror clock soon, and I will post it here once it's ready.
Mirror Clock Project Part 8 - The Mirror
Nothing beats the real thing, and rather than try to recreate an antique mirror, I was able to find one through an antiques restorer friend. The mirror he gave me had a fairly severe scratch across it on one side, but the size I needed would avoid this scratch completely. One other problem with the mirror was that it had several blobs of hot glue on the back.


Removing the glue was a trial and error method, and the first two methods failed. The first scratched the silvering, while the second pulled all of it off:

I eventually was able to remove all the glue using a mix of heat and a mild scrubbing in lacquer thinner. Once the glue was gone, I was able to cut the mirror to size and fit it onto the door. I used 12 small wood strips with a tiny nail in each.


The "inside back" wood panel was attached with small square nails. Some of these panels are fixed with the beveled edge facing out, while others have it facing in. This side of the wood was nicer, and my bevels were rather rough, so I chose to have the bevels inside. The clearances on this were tight, and this is probably why most of these doors are 3/4" thick rather than 5/8".

A few other small details that I did not show are the two rear bolts that hold the movement in place. Most are held in place with a single centre bolt, and a few small square nails on the interior to keep the movement from shifting, but I wanted a very secure fit since the weight is so heavy.

I don't remember if I had shown the pivot hole divots in the backboard, but I also adjusted the colour of the wooden dial blocks.

Aside from making a custom label, the clock is now finished and running nicely. Final photos will be shown in the next post.
Removing the glue was a trial and error method, and the first two methods failed. The first scratched the silvering, while the second pulled all of it off:
I eventually was able to remove all the glue using a mix of heat and a mild scrubbing in lacquer thinner. Once the glue was gone, I was able to cut the mirror to size and fit it onto the door. I used 12 small wood strips with a tiny nail in each.
The "inside back" wood panel was attached with small square nails. Some of these panels are fixed with the beveled edge facing out, while others have it facing in. This side of the wood was nicer, and my bevels were rather rough, so I chose to have the bevels inside. The clearances on this were tight, and this is probably why most of these doors are 3/4" thick rather than 5/8".
A few other small details that I did not show are the two rear bolts that hold the movement in place. Most are held in place with a single centre bolt, and a few small square nails on the interior to keep the movement from shifting, but I wanted a very secure fit since the weight is so heavy.
I don't remember if I had shown the pivot hole divots in the backboard, but I also adjusted the colour of the wooden dial blocks.
Aside from making a custom label, the clock is now finished and running nicely. Final photos will be shown in the next post.
Monday, January 5, 2015
A New Project
I'm currently working on a new project. It's a reproduction of a New Hampshire mirror clock. One of the reasons I've decided to work on this project (instead of finishing other ones) is to practice some of the restoration skills and techniques that I've learned over the past few years. One of the other reasons is that I'm in the mood to paint, and most of this clock will have painted surfaces. It's also winter, so I can't work on any large house projects, or do too much woodworking in the freezing cold shop.
This clock will be a fairly simple build (I've been working on it for a few days and the main case is nearly done), but the real challenge on this clock will be the treatment of surfaces to achieve a realistic antique look on what's basically a brand new clock. The look I'm aiming for is a period 1820s clock in good, but not perfect shape. This means that I want it to have a few blemishes, imperfections, and "character" but without going overboard. That said, I'm also making an effort to make the clock not so convincing that someone later on could pass it off as a fake. For this reason, I'm choosing to use one of my spare ogee clock movements in the clock. I'll go into more details about that later.
On this clock, I want to practice gilding on gesso (something I've never done before), antiquing new wood to match old wood (ie: getting that perfect shade of old reddish brown), making a convincing silvered mirror, and reverse painting in bronze powders.
I also want to print my own antique style label for the clock, paint a custom dial, and possibly even cast some custom lead weights.
There's still a lot to do on this clock, but I'll be doing my best to document the process as I go along. The next step will be the backboard, and the turnings.
Hopefully I'll have some photos to share soon.
This clock will be a fairly simple build (I've been working on it for a few days and the main case is nearly done), but the real challenge on this clock will be the treatment of surfaces to achieve a realistic antique look on what's basically a brand new clock. The look I'm aiming for is a period 1820s clock in good, but not perfect shape. This means that I want it to have a few blemishes, imperfections, and "character" but without going overboard. That said, I'm also making an effort to make the clock not so convincing that someone later on could pass it off as a fake. For this reason, I'm choosing to use one of my spare ogee clock movements in the clock. I'll go into more details about that later.
On this clock, I want to practice gilding on gesso (something I've never done before), antiquing new wood to match old wood (ie: getting that perfect shade of old reddish brown), making a convincing silvered mirror, and reverse painting in bronze powders.
I also want to print my own antique style label for the clock, paint a custom dial, and possibly even cast some custom lead weights.
There's still a lot to do on this clock, but I'll be doing my best to document the process as I go along. The next step will be the backboard, and the turnings.
Hopefully I'll have some photos to share soon.
Monday, December 29, 2014
Making Mirrors
It's been quite a while that I've wanted to experiment with Krylon's "Looking Glass" spray paint, but unfortunately due to some restrictions, it wasn't being sold in Canada until very recently when I found some at our local Michael's store (I looked for it every time I visited the store).
Over the past several years, I've seen some amazing mirrored projects using this product, and I thought it might be an excellent product for use on antique clocks. Some of the projects I had seen included old leaded glass windows turned into mirrors, as well as many imitation mercury glass vases and bobbles. I thought it might also be fun to use old glass clock bezels and turn them into convex mirrors. The uses for this product are nearly endless. The only requirement is that it should be applied to the back side of any glass surface.
One other benefit to this product is that you can apply a layer of "antiquing" to your clear glass before the silvering is applied. If you search for tutorials online (as I did) you might quickly find that most effects simply call for a mist of water (or vinegar and water) over the glass, followed by the spray paint, and then cleaning off the water drops once the paint is dry.
On most of the tutorials, the effect is WAY too exaggerated and it doesn't look real. I wanted something more believable. I decided to try several other techniques and experiments on some scrap glass pieces. All the samples are backed with flat black paint.

In the photo above, you can see the 5 samples I made (and there are endless other variations or combinations you can try). Each will be explained individually below.
Since mirrors are notoriously difficult to photograph, I did my best to catch a few angles.


SAMPLE 1:

In this first sample, I mixed some black and brown acrylic paint, and thinned it with water. I then used a stiff bristle brush to "flick" paint onto the glass. This gives a subtle, yet realistic spotting effect.
SAMPLE 2:

Sample 2 is one of the most interesting and visually striking experiments I tried. It's simply a very diluted black watercolour wash. Because the water doesn't easily stick to the glass surface, you're left with a very random pattern of shapes. The effect is transparent, but also has a fairly strong "matted" appearance depending on the angle (see reflection photos above). An entire mirror done with this technique would be pretty unusable, but definitely very interesting (and very old/damaged looking).
SAMPLE 3:

This is the standard water mist method, using a very fine sprayer. What's so nice about this method is that it creates very realistic "peeling" edges around each "hole". The only problem with this technique is that it's very hard to create a realistic wear pattern. Either there's way too many spray droplets everywhere, or the droplets are too small, or too large. For this technique, you just spray water onto the glass, apply several thin coats of mirror paint, and then you wipe (pat down) the water drops where the paint hasn't adhered. The paint dries extremely fast, so you only need to wait a few minutes to do this, but be careful not to smear the water around. If you do, there's no way to fix it, and you'll need to start over.
SAMPLE 4:

Samples 4 and 5 were the least successful of the 5. This one shows how the glass might look with the water droplet technique from sample 3, with just another light spray of mirror paint applied after wiping off the water (to make the effect more subtle). It might be nice to try this effect on a larger surface. It would likely give pale ghostly dots all over the surface.
SAMPLE 5:
This sample was trying to imitate mirrors that have a darkened gradient around the exterior edges. I used spray paint for this, but it didn't come out quite as I had hoped. The spray was too wide, and it may have needed to be darker. This effect might work better on a larger area, and using a better spray paint or nozzle.
Armed with these samples, I decided that the most realistic effect would be a simple pattern of painted dots (sample 1). I had one particular clock in mind, and I decided to go ahead and try it out. The glass had already been cut and prepared for the clock (antique glass), and I just had to clean it. Here are the final results.


As you can see, the painted effect looked much better on the smaller samples. The effect is quite foggy, and not quite as reflective as I had expected. The dots also didn't show up as much as I had expected.
Here's a fairly good close-up of the glass. You can clearly see the spots, as well as the distinct "painted texture" that the mirror paint produces.

One of the only other methods I've tried for making hand-made mirrors is the technique that uses actual sheets of silver leaf (it can be fake silver leaf as well). That method gives much better results, but it's also a lot more time consuming, more difficult/delicate, and the main reason I didn't like that method was that all the edges of the silver sheets show up in the finished mirror. This method follows instructions from Tom Temple's "Extreme Restoration" book. It's an excellent book for learning to properly (and invisibly) repair clocks and other antiques. You can also find other tutorials online for this method, so I'm only going to give a very brief overview on this method.
These are OLD photos from nearly a decade ago. I thought I had them already uploaded to an online photo album, but I couldn't find them, so I dug through my old files and found them again.
The first steps involve laying two layers of silver leaf onto the glass using a special sizing/gilding water.

Second layer:

Once it's dry, the back is polished using soft cotton and gentle pressure.

The back of the mirror is then painted to protect it, and to prevent the silver (or imitation silver) from tarnishing or degrading.
The finished mirror is quite beautiful, highly reflective, and gives a realistic appearance of a mercury glass mirror. As I said before, the only drawback is that the lines between the sheets of silver leaf are visible. Also note that this mirror was done on antique wavy glass.


Over the past several years, I've seen some amazing mirrored projects using this product, and I thought it might be an excellent product for use on antique clocks. Some of the projects I had seen included old leaded glass windows turned into mirrors, as well as many imitation mercury glass vases and bobbles. I thought it might also be fun to use old glass clock bezels and turn them into convex mirrors. The uses for this product are nearly endless. The only requirement is that it should be applied to the back side of any glass surface.
One other benefit to this product is that you can apply a layer of "antiquing" to your clear glass before the silvering is applied. If you search for tutorials online (as I did) you might quickly find that most effects simply call for a mist of water (or vinegar and water) over the glass, followed by the spray paint, and then cleaning off the water drops once the paint is dry.
On most of the tutorials, the effect is WAY too exaggerated and it doesn't look real. I wanted something more believable. I decided to try several other techniques and experiments on some scrap glass pieces. All the samples are backed with flat black paint.
In the photo above, you can see the 5 samples I made (and there are endless other variations or combinations you can try). Each will be explained individually below.
Since mirrors are notoriously difficult to photograph, I did my best to catch a few angles.
SAMPLE 1:
In this first sample, I mixed some black and brown acrylic paint, and thinned it with water. I then used a stiff bristle brush to "flick" paint onto the glass. This gives a subtle, yet realistic spotting effect.
SAMPLE 2:
Sample 2 is one of the most interesting and visually striking experiments I tried. It's simply a very diluted black watercolour wash. Because the water doesn't easily stick to the glass surface, you're left with a very random pattern of shapes. The effect is transparent, but also has a fairly strong "matted" appearance depending on the angle (see reflection photos above). An entire mirror done with this technique would be pretty unusable, but definitely very interesting (and very old/damaged looking).
SAMPLE 3:
This is the standard water mist method, using a very fine sprayer. What's so nice about this method is that it creates very realistic "peeling" edges around each "hole". The only problem with this technique is that it's very hard to create a realistic wear pattern. Either there's way too many spray droplets everywhere, or the droplets are too small, or too large. For this technique, you just spray water onto the glass, apply several thin coats of mirror paint, and then you wipe (pat down) the water drops where the paint hasn't adhered. The paint dries extremely fast, so you only need to wait a few minutes to do this, but be careful not to smear the water around. If you do, there's no way to fix it, and you'll need to start over.
SAMPLE 4:
Samples 4 and 5 were the least successful of the 5. This one shows how the glass might look with the water droplet technique from sample 3, with just another light spray of mirror paint applied after wiping off the water (to make the effect more subtle). It might be nice to try this effect on a larger surface. It would likely give pale ghostly dots all over the surface.
SAMPLE 5:
This sample was trying to imitate mirrors that have a darkened gradient around the exterior edges. I used spray paint for this, but it didn't come out quite as I had hoped. The spray was too wide, and it may have needed to be darker. This effect might work better on a larger area, and using a better spray paint or nozzle.
Armed with these samples, I decided that the most realistic effect would be a simple pattern of painted dots (sample 1). I had one particular clock in mind, and I decided to go ahead and try it out. The glass had already been cut and prepared for the clock (antique glass), and I just had to clean it. Here are the final results.
As you can see, the painted effect looked much better on the smaller samples. The effect is quite foggy, and not quite as reflective as I had expected. The dots also didn't show up as much as I had expected.
Here's a fairly good close-up of the glass. You can clearly see the spots, as well as the distinct "painted texture" that the mirror paint produces.
One of the only other methods I've tried for making hand-made mirrors is the technique that uses actual sheets of silver leaf (it can be fake silver leaf as well). That method gives much better results, but it's also a lot more time consuming, more difficult/delicate, and the main reason I didn't like that method was that all the edges of the silver sheets show up in the finished mirror. This method follows instructions from Tom Temple's "Extreme Restoration" book. It's an excellent book for learning to properly (and invisibly) repair clocks and other antiques. You can also find other tutorials online for this method, so I'm only going to give a very brief overview on this method.
These are OLD photos from nearly a decade ago. I thought I had them already uploaded to an online photo album, but I couldn't find them, so I dug through my old files and found them again.
The first steps involve laying two layers of silver leaf onto the glass using a special sizing/gilding water.
Second layer:
Once it's dry, the back is polished using soft cotton and gentle pressure.
The back of the mirror is then painted to protect it, and to prevent the silver (or imitation silver) from tarnishing or degrading.
The finished mirror is quite beautiful, highly reflective, and gives a realistic appearance of a mercury glass mirror. As I said before, the only drawback is that the lines between the sheets of silver leaf are visible. Also note that this mirror was done on antique wavy glass.
Subscribe to:
Posts (Atom)